

A Japanese-themed sword wall is a curated display of traditional blades, such as katanas, wakizashi, and tanto, mounted to create a focal point that honors both craftsmanship and cultural heritage. Done well, it combines safety, visual balance, and authentic Japanese aesthetics in a single wall installation. This guide covers every stage of the process: the tools and materials you need, how to plan your layout, step-by-step mounting, design choices that reinforce authenticity, and how to troubleshoot the most common problems. Whether you are decorating with swords for the first time or refining an existing display, you will leave with a clear, practical plan.
What tools and materials do you need to design a Japanese themed sword wall?
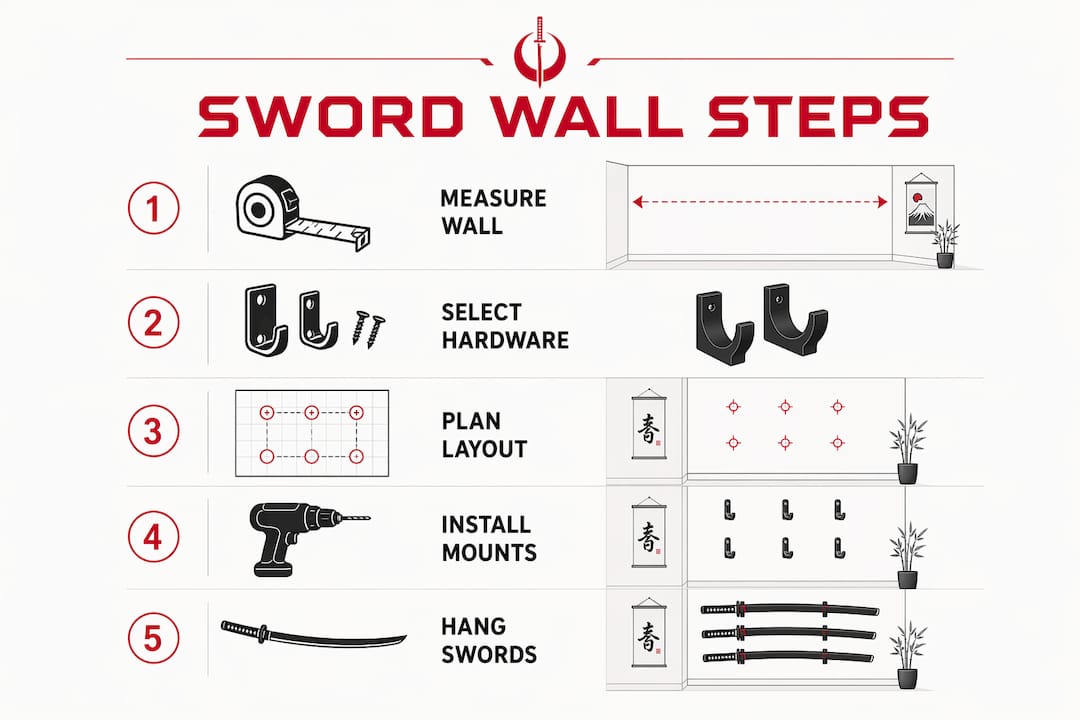
The right materials separate a display that looks polished from one that looks improvised. Before you touch a drill, gather everything in one place.
Mounting hardware:
- Stud finder (magnetic or electronic) to locate load-bearing points
- Lag screws (3-inch minimum) for stud mounting
- Toggle anchors rated above 45 lb for drywall-only sections
- Pilot drill bits matching your screw diameter
Mount types to consider:
- Wooden cleats: cut from oak or walnut, shaped to cradle the saya (scabbard) at a slight downward angle
- Leather strap hangers: hand-sewn with stainless steel rivets, these leather sword hangers develop a rich patina over time and fit katana, wakizashi, and tanto in S, M, L, and XL sizes
- Commercial bracket sets: powder-coated steel brackets with foam or felt inserts, available in single and double configurations
Finishing and protective materials:
- Felt strips or vegetable-tanned leather pads at every contact point to prevent blade abrasion
- Padding materials like felt or vegetable-tanned leather also reduce metal noise, keeping the display quiet and refined
- Matte or semi-matte wall paint in warm gray, clay, or soft white (more on this in the design section)
Lighting:
Warm-white LED strip lights or adjustable spotlights rated at 2700 to 3000K with a CRI of 90 or above produce the clearest blade definition. Warm-white lighting with diffuse sources enhances blade clarity while reducing the glare that degrades sword polish. For deeper guidance on positioning and beam angles, the Moonswords lighting for sword display guide covers collector-specific techniques in detail.
Pro Tip: Buy one extra set of toggle anchors before you start. Walls rarely cooperate perfectly, and having backup hardware on hand prevents a mid-project trip to the hardware store.
How should you plan the layout and arrangement of swords?
Layout planning is where most first-time installers make costly mistakes. Measure twice, mark once, and use templates before committing to any holes.
Step 1: Establish your centerline height. Mount centerlines placed at 55 to 59 inches above the floor align with average standing eye level and create natural viewing comfort. Mark this line with painter’s tape across the full width of your display area.
Step 2: Map your sword hierarchy. Traditional Japanese sword display follows a clear vertical order: katana at the top, wakizashi in the middle, and tanto at the bottom. This arrangement reflects the historical rank of each blade and gives the wall an immediately recognizable cultural logic. Leather strap layouts with size variations accommodate all three blade types at multiple heights.
Step 3: Set your spacing. Consistent gaps between mount centerlines of 90 to 120 mm for blades create visual rhythm without crowding. For a three-sword vertical stack, this means roughly 4 to 5 inches of clear space between each scabbard.
Step 4: Test with paper templates. Cut cardboard or paper to the exact length of each sword, tape them to the wall at your planned positions, and step back. Digital mockup tools like Coohom’s room planner let you test groupings virtually before a single hole is drilled.
Additional layout considerations:
- Keep the display at least 18 inches from door swing paths to prevent accidental contact
- Avoid positioning swords directly above seating where a mount failure could cause injury
- Account for glare from windows by checking the wall at different times of day before finalizing position
- For horizontal arrangements, stagger blade tips and handles to create visual movement rather than a static row
The role of swords in Japanese interior design offers additional context on how traditional Japanese homes oriented blade displays relative to room function and natural light.
How do you mount and secure Japanese swords safely?
A katana weighs roughly 1.1 to 1.5 kg, and a full daisho set (katana, wakizashi, tanto) can exceed 3 kg combined. Sturdy stud-mounted hardware or heavy-duty anchors rated above 25 to 45 lb per mount point are the minimum safe standard. Follow these steps in order.
- Locate and mark studs. Run your stud finder horizontally across the display area and mark each stud with painter’s tape. Studs in American homes are typically 16 inches apart on center.
- Confirm with a pilot hole. Drill a small pilot hole at your first mark to confirm solid wood. If you hit hollow drywall, shift your mark and try again.
- Prepare your mounts. For wooden cleats, cut oak or walnut stock to your desired length, sand smooth, and apply a finish that matches your room’s trim. For commercial brackets, dry-fit them against the wall before drilling.
- Attach mounts with appropriate hardware. Drive lag screws into studs for maximum holding strength. In drywall sections, use toggle anchors rated well above the sword’s weight to build in a safety margin.
- Add padding to all contact points. Wrap felt strips or cut vegetable-tanned leather pads to fit every surface that will touch the blade or scabbard. This prevents abrasion to the saya’s lacquer finish and eliminates metal-on-metal noise.
- Place swords and add retention. Leather straps looped over the tsuka (handle) or saya, or rare-earth magnets recessed into wooden cleats, prevent swords from being knocked free. Magnets work well for display-only pieces but should not be used near swords with sensitive hamon (temper lines) that you plan to photograph.
- Check angle and alignment. A 3 to 5 degree downward declination toward the tip keeps the sword seated in its mount by gravity and mirrors the traditional Japanese display convention.
“The mount is not just hardware. It is the first statement your display makes about how seriously you take the craft.”
Pro Tip: Before hanging any sword, apply a light coat of choji oil to the blade. The installation process involves handling, and even clean hands transfer oils that can cause rust over time.
What design elements create an authentic Japanese sword wall?
Authenticity in a Japanese sword wall display comes from restraint, not decoration. The sword is the subject. Every other design choice should support it without competing.

Wall color and surface:
Neutral, matte backdrops in warm gray, clay, or soft white reduce glare and keep the blade as the visual focal point. Glossy paint creates specular highlights that scatter light and distract the eye from the hamon and hada (grain pattern) of the blade. Semi-matte finishes are the practical compromise if you want a slight sheen.
Complementary decor:
Japanese calligraphy scrolls (kakejiku), a single bonsai on a nearby shelf, or a piece of Asian-inspired wall art such as an antique gold Buddha wall relief can frame the display without overwhelming it. The goal is negative space. A crowded wall diminishes every piece on it.
Display format comparison:
| Format | Best for | Trade-off |
|---|---|---|
| Horizontal wall mounts | Long katanas, single-sword focus | Requires more horizontal wall space |
| Vertical stacked mounts | Daisho sets, traditional hierarchy | Needs ceiling clearance of 7+ feet |
| Shadowbox frames | Tanto, display-only pieces | Limits access for maintenance |
| Acrylic cases | High-value or antique blades | Higher cost, less visual openness |
Lighting placement:
Position LED strip lights above the display at a 30 to 45 degree downward angle to illuminate the blade length without creating hotspots on the tsuba (guard). Avoid placing lights directly in front of the wall, as this flattens the three-dimensional detail of the blade. For collectors comparing display approaches, the minimalist vs. traditional sword displays guide breaks down the trade-offs in detail.
Acoustic considerations:
Textile elements like a wool area rug, linen wall panels, or a fabric-backed mount board absorb vibration and prevent the subtle rattling that can occur when swords are mounted near HVAC vents or high-traffic floors.
What are the most common challenges when installing a sword wall?
Most installation problems fall into a short list of predictable categories. Knowing them in advance saves time and protects your swords.
- Mounting over door swings or high-traffic zones. A door that opens into the display area is a safety hazard. Map every door swing radius before marking your first mount position.
- Blade scratching from inadequate padding. Even a single unpadded contact point will scratch lacquered saya over time. Check every bracket and cleat surface before hanging.
- Anchor failure from undersized hardware. Consistent mounting into studs with safety clearances and proper anchors is the standard that prevents accidents in family environments. Never use standard picture-hanging nails for swords.
- Glare and hotspots. If your wall paint is too reflective, repositioning lights alone will not solve the problem. Repaint with a matte finish before adjusting your lighting setup.
- Child safety. Secondary retention straps, cabinet locks on lower mounts, or relocating the display above the 60-inch line are all practical options for homes with young children. A locked katana display case is worth considering for tanto and wakizashi at lower heights.
Pro Tip: After installation, give each mount a firm downward pull test with no sword in place. If the mount shifts even slightly, reinforce it before hanging any blade.
Key takeaways
A well-executed Japanese sword wall requires the right hardware, a planned layout grounded in traditional hierarchy, matte neutral backdrops, and warm-white lighting to keep the blade as the undisputed focal point.
| Point | Details |
|---|---|
| Use stud-rated hardware | Mount into studs or use anchors rated above 45 lb to safely support the katana's weight. |
| Follow the traditional hierarchy | Place katana at top, wakizashi in middle, and tanto at bottom for cultural authenticity. |
| Choose matte wall finishes | Warm gray or clay matte paint eliminates glare and keeps focus on the blade. |
| Light at 2700 to 3000K | High-CRI warm-white LEDs reveal hamon and hada detail without creating hotspots. |
| Pad every contact point | Felt or vegetable-tanned leather on all mount surfaces prevents saya scratching and metal noise. |
Why restraint is the real design principle here
I have seen sword walls that looked more like trophy rooms than living spaces, and the difference almost always came down to one decision: how much the designer trusted the sword itself to carry the wall.
The most striking displays I have encountered share a common quality. They are quiet. One or three blades on a matte gray wall, lit from above at a shallow angle, with nothing competing for attention. The hamon does the work. The geometry of the tsuka against the saya does the work. The designer’s job is to get out of the way.
Where I see people go wrong is in adding too much. A katana next to a neon sign, or mounted above a gallery wall of framed prints, loses its identity entirely. The sword becomes a decoration rather than the subject. That is a loss, both aesthetically and culturally.
My practical advice: start with one sword and one mount. Live with it for a week before adding anything else. You will quickly learn whether the wall needs more or whether it is already complete. The historical eras of Japanese sword making shaped not just the blades but the entire philosophy of how they were displayed. That philosophy was always about honoring the object, not the room.
— Kenji Smith
Find the right sword for your display at Moonswords

The quality of your display starts with the quality of the blade. At Moonswords, every katana is hand-forged by master artisans using clay tempering and full tang construction, producing pieces that carry genuine visual weight on any wall. Whether you are building your first display or adding a centerpiece to an established collection, the authentic Japanese swords collection covers entry-level pieces through the master-crafted works of bladesmith Zhao Peiyan. For collectors ready to invest in a true focal piece, the high-end katana collection showcases blades with the hamon clarity and hada detail that reward the kind of careful lighting and mounting this guide describes.
FAQ
What is the correct height to mount a sword on the wall?
Mount centerlines at 55 to 59 inches above the floor for comfortable standing eye-level viewing. This height also keeps blades out of easy reach of young children without requiring a ladder for maintenance.
How do I display swords without damaging the blade or scabbard?
Pad every contact point with felt strips or vegetable-tanned leather before hanging. Avoid bare metal brackets, and apply a light coat of choji oil to the blade before and after installation to prevent rust from handling.
What wall color works best behind a Japanese sword display?
Matte or semi-matte warm gray, clay, or soft white are the most effective choices. Glossy paint creates specular reflections that distract from the blade’s detail and degrade the overall visual impact of the display.
Can I mount a katana on drywall without hitting a stud?
Yes, but only with heavy-duty toggle anchors rated well above the sword’s weight. A katana weighs 1.1 to 1.5 kg, so use anchors rated for at least 45 lb per mount point and test each one with a firm pull before hanging.
How many swords should a beginner display on one wall?
Start with one to three swords. A single katana or a traditional daisho set (katana, wakizashi, tanto) creates a focused, culturally coherent display without requiring complex layout planning or multiple mount types.