

Collectors often assume the role of lighting in sword display is straightforward: add a bright bulb and call it done. That assumption misses most of what makes a well-lit sword genuinely stunning. Illumination is the difference between a blade that looks flat and forgettable and one that reveals every detail of its hamon, hada, and polished steel. The right lighting setup protects your swords from heat and UV damage while pulling out textures, color depth, and the kind of visual drama that makes a katana or jian impossible to ignore. This guide covers the principles that museums apply, the fixtures collectors rely on, and the specific decisions that take a display from adequate to exceptional.
Table of Contents
- Key Takeaways
- How lighting affects sword display: perception, texture, and detail
- Museum lighting principles for serious collectors
- Comparing lighting fixtures for sword displays
- Color temperature and placement for different sword styles
- Practical tips for setting up your sword display lighting
- My perspective on lighting as the final layer of craftsmanship
- Illuminate your collection with swords worth the spotlight
- FAQ
Key Takeaways
| Point | Details |
|---|---|
| CRI matters more than brightness | High color rendering index (CRI 95+) reveals authentic hues and textures in steel and ornamentation. |
| LEDs protect and display simultaneously | Low-heat, low-UV LED systems preserve swords while delivering precise, controllable illumination. |
| Color temperature shapes perception | Warm light (2700K–3000K) suits wood and lacquer fittings; cool light (4000K–5000K) enhances bare steel and metalwork. |
| Angle is as important as intensity | Grazing light placed at low angles reveals surface texture and hamon lines that flat overhead light erases. |
| Glare destroys display quality | Poor glare management creates reflections on glass and acrylic that completely obscure fine sword details. |
How lighting affects sword display: perception, texture, and detail
Before choosing a single fixture, it helps to understand what light actually does to a sword’s appearance. This is what lighting specialists and conservators call “display illumination design,” and it goes well beyond lumens and wattage.
The first factor is color rendering. High CRI lighting (95+) is the standard recommendation for metalwork and ornamentation because it allows the human eye to see nuanced hues with accuracy. A polished tamahagane blade illuminated under low-CRI lighting looks gray and uniform. Under high-CRI light, the same blade shows the blue-gray gradient of the hamon, the folded grain of the hada, and the warm copper tones in any habaki or tsuba fittings. The sword looks alive.
Angle and direction of light are equally consequential. Light positioned directly overhead or perfectly parallel to a blade flattens texture and minimizes relief. Grazing light, placed at roughly 15 to 30 degrees to the blade surface, catches every tiny variation in the polish and projects it as visible shadow and highlight. This technique is exactly why lighting decisions beyond aesthetics matter so much. Poor angle means the craftsmanship your sword embodies stays invisible.
Key issues that reduce display quality:
- Glare and reflections on glass cases. Poorly positioned lights create mirror-like reflections that block the viewer from seeing the sword at all. Professional LED museum lighting integrates glare control optics specifically for this reason.
- Hotspots. A single intense beam hitting one section of a blade creates an unnatural blown-out spot while leaving the rest in shadow.
- Color temperature mismatch. Lighting that does not suit the sword’s materials can make warm wood fittings look cold and sterile, or make bright steel look yellowed and aged.
- UV and heat exposure. Ultraviolet radiation degrades lacquer, cord wrapping, and wooden saya over time. Heat accelerates oxidation on steel.
Pro Tip: Test your display lighting by holding a piece of matte gray card behind the blade. If the light renders the card as a neutral gray rather than yellow or blue, your CRI and color temperature are working together correctly.
Museum lighting principles for serious collectors
Professional museum curators treat exhibit illumination as a discipline that blends conservation science with visual storytelling. The principles they apply are directly relevant to any collector who wants to display swords properly.
Modern museums rely almost exclusively on LED systems because LEDs deliver high CRI, low heat, and precise beam control without the ultraviolet and infrared radiation that damages sensitive objects over time. For swords, this matters because it protects not just the steel but the organic materials: ray skin (same), silk cord wrapping, and lacquered scabbards that would degrade noticeably under older halogen or fluorescent fixtures.
The Royal Armouries Museum in Leeds offers an instructive example. Their curators use controllable spotlights to vary color temperature across different exhibit areas, running cooler 4000K light on stone and armor and warmer 3000K light on organic and decorative objects. The approach demonstrates how a single color temperature cannot serve every material equally.
Research into how museum lighting has evolved confirms that LED adoption supports longevity, preservation, and display quality simultaneously. The key insight is that museum professionals do not choose between protecting an object and making it look good. With the right LED system, you achieve both. This balance directly reflects the importance of lighting in exhibits where display quality influences how collectors and visitors evaluate condition and value.
The features that define museum-grade display lighting are:
- Low UV output to prevent photochemical degradation of lacquer, cord, and organic fittings
- Minimal infrared radiation to reduce heat buildup inside enclosed cases
- High CRI (95 or above) for accurate color rendering of steel, bronze, copper, and decorative inlays
- Dimming capability to adjust brightness without changing color temperature
- Narrow beam angles (typically 15 to 36 degrees) for focused spotlighting that minimizes spill
Comparing lighting fixtures for sword displays
Choosing the right fixture type shapes everything from installation complexity to the final visual effect. Here is how the main options compare for sword collectors.
| Fixture Type | Best Use | Key Benefit | Main Drawback |
|---|---|---|---|
| LED strip lights | Case interior edges and under-shelf accents | Even, low-heat ambient glow | Limited directional control |
| Puck lights | Enclosed display cases, targeted spots | Compact, focused beam | Can create hotspots if uncovered |
| Track spotlights | Room or cabinet top-mount | Fully adjustable direction | Requires ceiling or rail installation |
| Ambient backlighting | Behind wall mounts or case backgrounds | Dramatic depth and visual drama | Needs diffusion panel to avoid glare |
LED strips are well-suited to the interior edges of acrylic or glass display cases. They provide a clean ambient wash that eliminates dark corners, and because they generate very little heat, they are safe inside enclosed spaces where temperature builds quickly. Cool-white LED strips work especially well on polished steel blades, where the light amplifies the mirror-like finish.

Track spotlights offer the most flexibility for collectors displaying swords on wall mounts or open stands. You can reposition the head to change the angle relative to the blade whenever you rearrange the display, which makes them ideal for collectors who rotate pieces regularly.
Backlighting combined with reflective or mirrored bases creates the striking effect of a sword appearing to float against a luminous background. This technique works particularly well for katanas displayed horizontally against a dark fabric panel. The glow from behind separates the blade from the background and adds a sense of depth that direct front lighting cannot replicate.
Pro Tip: Layer at least two light sources in any sword display: one directional spot to reveal texture and one softer ambient source to fill shadows. This mimics how professional gallery lighting works and prevents the harsh contrast that single-source setups create.
Color temperature and placement for different sword styles
Getting the color temperature right is one of the most overlooked aspects of sword display lighting tips, yet it has an immediate visible impact on how swords are perceived.
Warm light in the 2700K to 3000K range complements swords with wooden fittings, ray skin grips, silk wrapping, and warm-toned bronze or brass hardware. A Japanese katana with a natural wood saya and a copper menuki looks genuinely warm and traditional under 2700K light. That same setup under 5000K light will make the organic elements look clinical and out of place, stripping the sword of its historical character.
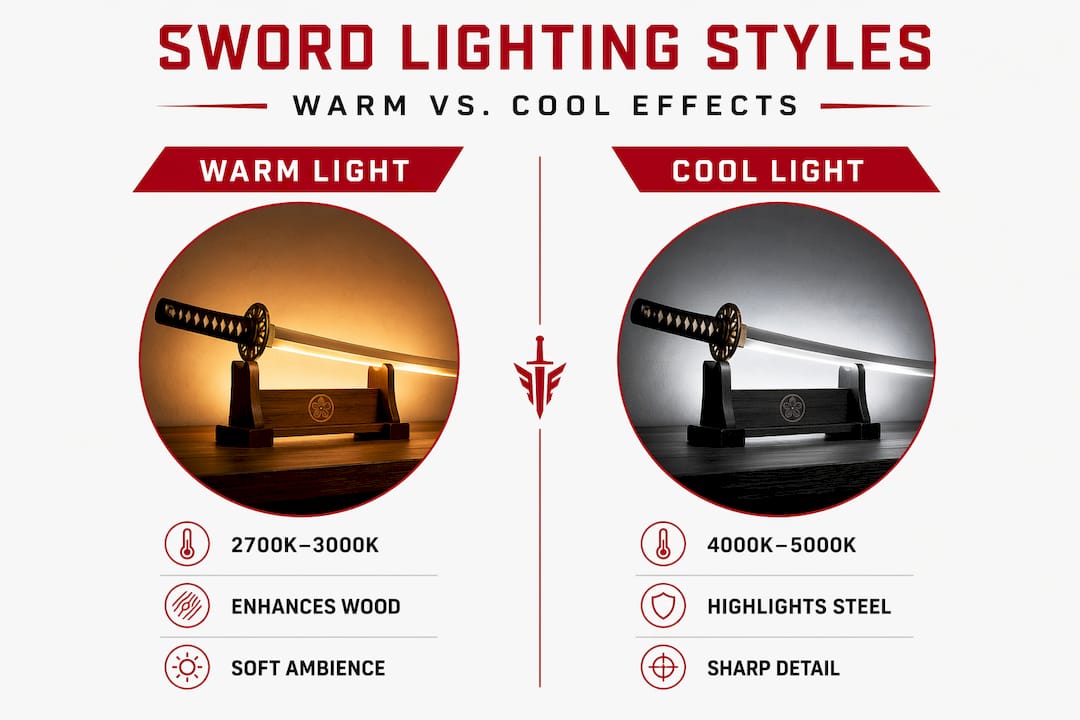
Cool light in the 4000K to 5000K range serves bare steel and polished blade surfaces better. A Chinese jian with a mirror-polished blade and minimal organic fittings catches dramatically more visual energy under cool white light. The steel appears sharper, the edge line more defined, and any geometric patterns etched into the blade become far more readable.
Placement guidance by display type:
- Wall-mounted horizontal display. Place the primary light source 30 to 45 degrees above the plane of the blade, angled slightly toward the cutting edge rather than straight down the spine. This angle catches the hamon most effectively.
- Vertical stand or upright display. Use a floor-level or low angled uplight combined with a softer overhead source. Uplighting on a sword creates a dramatic effect that emphasizes the geometry of the blade and guard.
- Enclosed glass or acrylic case. Mount strip lights at the top interior edge angled downward, and consider a secondary strip at the base facing upward for fill. Avoid mounting lights directly behind glass at the front of the case, which is the most common cause of viewer-facing glare.
Adjustable wireless lighting controls for exhibitions allow you to dial brightness up when actively viewing and dim it down for passive display or preservation. Dimming does not just save energy. It extends LED lifespan and reduces cumulative light exposure on your swords over months and years.
Practical tips for setting up your sword display lighting
Applying the theory to a real display comes down to a series of deliberate choices, made in order.
- Choose LED fixtures rated for low UV and low heat. For enclosed cases, this is non-negotiable. The LED technology for collectors available today is affordable, long-lasting, and far superior to older options. Look for fixtures with explicit UV filtration ratings or UV-free product designations.
- Install a dimmable driver or controller. Dimming capability gives you full control over brightness without rewiring. Smart dimmers that integrate with home automation systems let you set lighting scenes for day and night display conditions.
- Position fixtures before permanently mounting them. Use masking tape to temporarily hold strip lights or puck lights in place, then turn them on and study the sword from the viewing angle. Reposition until glare is eliminated and texture is visible before committing to a final installation.
- Use diffusion film or frosted lenses on bare LED strips. Raw LED chips create dotted patterns of light and shadow on the sword surface. A diffusion layer smooths this into an even wash that looks far more professional.
- Pair your lighting with the right display method. A wall-mounted sword benefits from a dedicated track spotlight. A display case benefits from integrated strip lighting. Matching the fixture type to the sword display method prevents the mismatches that undermine otherwise well-lit collections.
- Inspect lighting regularly. LED bulbs and strips degrade slowly over time, shifting color temperature and losing output. Check your setup every six months and replace aging strips before the shift becomes visible in the display.
Pro Tip: If your display case has a mirrored or high-gloss back panel, use polarizing film on your light sources to cut reflections. This single addition can transform a case that looks cluttered with competing reflections into a clean, focused display.
My perspective on lighting as the final layer of craftsmanship
I’ve been around sword collections long enough to have watched a genuinely exceptional katana get completely overlooked in a poorly lit room, and a good-but-not-great blade become the focus of twenty minutes of conversation simply because the light hit it well. That experience shifted how I think about display lighting. It is not decorative. It is the final layer of craftsmanship.
What I’ve learned is that most collectors underestimate this entirely. They invest significantly in the sword itself, sometimes in a quality case or mount, and then point whatever fixture happens to be convenient at the blade. The result is a display that communicates none of what the sword actually is. The hamon disappears. The hada reads as a gray smear. The fittings look flat.
The hardest lesson I’ve come to is that brightness is not the goal. Accuracy is. When the light is calibrated to the sword’s materials and placed at the right angle, the blade tells its own story. You can see the forge work. You can read the temperature lines in the steel. The sword stops being an object in a case and becomes a record of a craftsman’s skill.
I’d encourage you to experiment with angle before buying new fixtures. Move a simple desk lamp around a blade in a dark room and watch what changes. You’ll understand more in ten minutes of that exercise than from reading any amount of theory. Then invest in proper LED fixtures once you know what angle and color temperature you’re looking for.
— Kenji Smith
Illuminate your collection with swords worth the spotlight
The finest lighting setup in the world is only as compelling as the sword at its center. At Moonswords, we forge blades specifically designed to reward close inspection: the hamon lines in our clay-tempered katanas, the hand-rubbed finishes on our jian, and the intricate fittings selected by master bladesmith Zhao Peiyan are details that proper illumination will showcase clearly.

Whether you are building your first display or refining a serious collection, our master-crafted katanas are designed to hold up under professional-level scrutiny. Every blade that leaves our workshop deserves the same attention to display that went into forging it. Browse the full collection at Moonswords and find the piece your display has been waiting for.
FAQ
What is the best color temperature for sword displays?
Warm light (2700K to 3000K) suits swords with wooden or organic fittings, while cool light (4000K to 5000K) enhances polished steel and metalwork. The Royal Armouries Museum uses exactly this approach to match light temperature to materials.
Why does CRI matter for illuminating swords?
CRI 95 or above ensures that the eye sees accurate color in the steel, lacquer, and fittings rather than a shifted or washed-out version. Low-CRI lighting makes the hamon and hada on a quality blade nearly invisible.
How do I stop glare on my display case glass?
Position your light source at an angle rather than directly facing the glass, and consider adding anti-glare diffusion film to the fixture. Professional museum lighting specifically integrates glare control optics to address this issue.
Are LED lights safe for swords inside enclosed cases?
Yes. LEDs produce minimal heat and very low UV radiation compared to halogen or fluorescent options, making them the safest choice for enclosed sword display cases where temperature and UV exposure accumulate.
What is the most common mistake collectors make with display lighting?
Relying on a single overhead light source is the most frequent error. It creates flat, shadow-free illumination that hides surface texture entirely. A combination of directional spotlighting and ambient fill, as used in professional display case lighting setups, reveals far more of the blade’s character.